一文解决vscode中借助CMake配置使用Opencv过程中的所有问题
创始人
2025-05-28 01:53:21
0次
vscode中借助CMake配置使用opencv过程中的问题
vscode编译工程的完整过程
- 编写好CMakeLists.txt
- vscode中 ctrl+shift+p 选择cmake configure
- vscode中 ctrl+shift+p 选择cmake build
CMake问题
1. set OpenCV_FOUND to FALSE so package “OpenCV” is considered to be NOT FOUND
解决:打开opencv安装文件夹下的OpenCVConfig.cmake文件(我的文件路径是D:\opencv\opencv\build\OpenCVConfig.cmake)修改倒数第二行 将 set(OpenCV_FOUND FALSE) 改为 set(OpenCV_FOUND TRUE)

2. fatal error: opencv2/opencv.hpp: No such file or directory #include
解决,CMakeLists.txt中加上
include_directories(D:\\opencv\\opencv\\build\\include\\)
include_directories(D:\\opencv\\opencv\\build\\include\\opencv2)
我的完整的CMakeLists.txt
cmake_minimum_required(VERSION 3.5)
project(path_smoother)add_compile_options(-std=c++11)set(OpenCV_DIR D:\\opencv\\opencv\\build\\)
find_package(OpenCV 4.5.1 REQUIRED COMPONENTS core highgui imgproc)
include_directories(${OpenCV_INCLUDE_DIRS})
include_directories(D:\\opencv\\opencv\\build\\include\\)
include_directories(D:\\opencv\\opencv\\build\\include\\opencv2)add_library(${PROJECT_NAME}bucket_queue.hmath_utils.hpose2d.hvec2d.hvec2i.hconstants.hpath_smoother.hbucket_queue.cppvec2d.cpppath_smoother.cpp)target_link_libraries(${PROJECT_NAME} ${OpenCV_LIBS})add_executable(path_smoother_example path_smoother_example.cpp)
target_link_libraries(path_smoother_example ${PROJECT_NAME} ${OpenCV_LIBS})
VSCODE问题
1. Unable to determine what CMake generator to use
解决:save workspace as… 创建一个.code-workspace文件,添加一行"cmake.generator": “Unix Makefiles”
{"folders": [{"path": "."}],"settings": {"cmake.generator": "Unix Makefiles"}
}
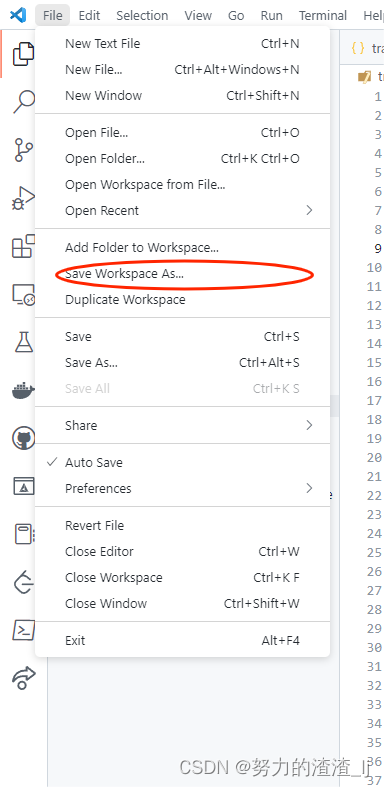
2. cmake configure之后 一些opencv头文件依然找不到
解决办法:头文件不在vscode默认文件夹下,因此还得再配置vscode的搜索头文件位置才能得到代码提示
ctrl shift p 选择C/C++ edit configuration
修改c_cpp_properties.json,在include path 中增加搜索文件(opencv的头文件路径)
我的文件:
{"configurations": [{"name": "Win32","includePath": ["${workspaceFolder}/**","D:/opencv/opencv/build/include/**","D:/opencv/opencv/build/include/opencv2/**"],"defines": ["_DEBUG","UNICODE","_UNICODE"],"compilerPath": "D:\\mingw\\mingw64\\bin\\gcc.exe","cStandard": "c17","cppStandard": "gnu++14","intelliSenseMode": "windows-gcc-x64","configurationProvider": "ms-vscode.cpptools"}],"version": 4
}
3. 第二个问题改完之后,还找不到头文件 报错:#include errors detected based on information provided by the configuration
把c_cpp_properties.json中的 “configurationProvider”,改为ms-vscode.cpptools
opencv问题
1. CV_BGR2GRAY’ was not declared in this scope
这是opencv2的用法,现在opencv3和4是COLOR_GARY2BGR,若还报错,则应该是cv::COLOR_GARY2BGR(加上命名空间)
相关内容
热门资讯
Anthropic发布Opus...
Anthropic真是“疯”了。就在刚刚,新模型Opus 5发布,性能直逼旗舰模型Fable 5,价...
马克龙“借坡下驴”,三月内态度...
近期,法国总统马克龙和德国总理默茨在记者面前公开表示:承认中国在创新领域的显著成绩,不会脱钩,并愿与...
数周谈判后,欧盟宣布对俄新制裁...
【环球时报驻俄罗斯特派记者 肖新新】欧盟23日批准对俄罗斯第21轮制裁方案。根据欧盟理事会发布的公告...
刘燕婷:特朗普重启战火,中东离...
【文/刘燕婷】 从6月达成协议到7月战争重启,美伊停火还未真正进入核谈判深水区,就已经被海峡危机炸回...
古特雷斯呼吁红海紧张局势立即降...
新华社联合国7月24日电(记者尚绪谦)联合国秘书长古特雷斯24日通过发言人迪雅里克发表声明,对也门胡...
献血科普|献血≠献浆,血站和单...
说起无偿献血,大家一点也不陌生,坐落在城市中各个角落的爱心献血屋和献血车,像一座座爱的会客厅,将人与...
特朗普称美国与伊朗仍在对话
新华社华盛顿7月24日电(记者黄强 徐剑梅)尽管美国和伊朗近日持续相互空袭,但美国总统特朗普24日在...
安庆迎江:法治护苗行 普法润童...
为扎实推进未成年人法治教育工作,有效预防和遏制校园欺凌行为,7月23日,宜城司法所联合钱牌楼社区开展...
专利战又起,LG新能源在美起诉...
界面新闻记者 | 高菁 国内电池龙头亿纬锂能(300014.SZ)在海外陷专利诉讼风波。 据《中国...
世界首富,一个月亏掉了4.5万...
一个月,财富没了4.5万亿啊! 比深圳一年的GDP还要多! 你说马斯克惨吧,他有4.5万亿可以亏。 ...