SpringSecurity学习(八)OAuth2.0、授权服务器、资源服务器、JWT令牌的使用
OAuth2是一个认证协议,SpringSecurity对OAuth2协议提供了响应的支持,开发者可以非常方便的使用OAuth2协议。
- 简介
- 四种授权模式
- Spring Security OAuth2
- GitHub授权登录
- 授权服务器与资源服务器
- 使用JWT
简介
OAuth是一个开放标准,允许用户让第三方应用访问该用户在某一网站上存储的私密资源(eg:头像、照片、视频等),切在这个过程中无需将用户名、密码提供给第三方应用。通过令牌(token)来实现这一功能,每个令牌授权一个特定的网站,在特定时间段内允许特定的资源。OAuth让用户可以授权第三方网站灵活访问他们存储在另外一些资源服务器上的特定信息,而非所有内容。对用户而言,我们在互联网中最常见的OAuth应用就是各种第三方登录,eg:QQ授权、微信授权、微博授权等。
注意:OAuth2是OAuth协议的下一版本,但不兼容OAuth1.0,OAuth2关注客户端开发者的简易性,同时为web应用、桌面应用、移动设备、IOT设备提供专门的认证流程。
OAuth2流程
四种授权模式
OAuth2协议一共支持四种不同的授权模式。
授权码模式:常见的第三方平台登录功能基本都是使用这种模式。简化模式:简化模式是不需要第三方服务端参与,直接在浏览器中向授权服务器申请令牌(token),如果是纯静态页面,则可以采用这种方式。密码模式:密码模式是用户把用户名、密码直接告诉客户端,客户端使用这些信息后授权服务器申请令牌(token)。这需要用户对客户端高度信任,eg:客户端应用和服务提供商就是同一家公司。客户端模式:客户端模式是指客户端使用自己的名义而不是用户的名义向服务提供者申请授权。严格的客户端模式并不能算做OAuth协议解决问题的一种方案,但是对于开发者来说,在一些为移动端提供的授权服务器上使用这种模式还是非常方便的。
无论哪种模式,其授权流程都是相似的,只不过在个别步骤上有着差异。整体流程如下:
A:用户打开客户端,客户端要求用户给与授权
B:用户同意给予客户端授权
C:客户端使用上一步获取授权,向认证服务器申请令牌
D:认证服务器对客户端进行认证,确认无误,同意发放令牌。
E:客户端使用令牌,向资源服务器申请获取资源。
F:资源服务器确认令牌无误,同意向客户端开放资源。
从上图中我们可以看出六个步骤中,B是关键,即用户怎么样才能给客户端授权。同时会发现OAuth2中包含四种不同的角色。

- Client:第三方应用
- Resource Owner:资源所有者
- Authorization Server:授权服务器
- Resource Server:资源服务器
授权码模式(Authorization Code)
是功能最完整、流程最严密、最安全并使用最广泛的一种OAuth2授权模式。同时也是最复杂的一种授权模式,他的特点就是通过客户端的后台服务器,与服务提供商的认证服务器进行互动。具体流程图如下:
Third-party application:第三方应用服务器,简称客户端clinet
Resource Owner:资源所有者,简称用户
User Agent:用户代理,指浏览器
Authorization Server:认证浏览器,即服务端专门用来处理认证的服务器
Resource Server:资源服务器,即服务端存放用户生成的资源的服务器。与认证服务器可相同也可以不同。
具体流程如下:
- A:用户访问第三方应用,第三方应用通过浏览器导向认证服务器
- B:用户选择是否给予授权
- C:假设用户授权,认证服务器将用户导向客户端事先指定的重定向URI,同时附上一个授权码
- D:客户端收到授权码,附上早先的重定向URI,向认证服务器申请令牌。这一步是在客户端后台的服务器上完成的,对用户不可见。
- E:认证服务器核对授权码和重定向URI,确认无误,向客户端发送访问令牌(access token)和更新令牌(refresh token)
核心参数:
oauth/avthorize?response_type=code&client_id=&redirect_uri=&scope=read

简化模式 implicit grant type
不通过第三方服务器,直接在浏览器向认证服务器来申请令牌,跳过授权码这个步骤。所有步骤在浏览器完成,令牌对访问者可见,切客户端不需要认证。具体流程图:
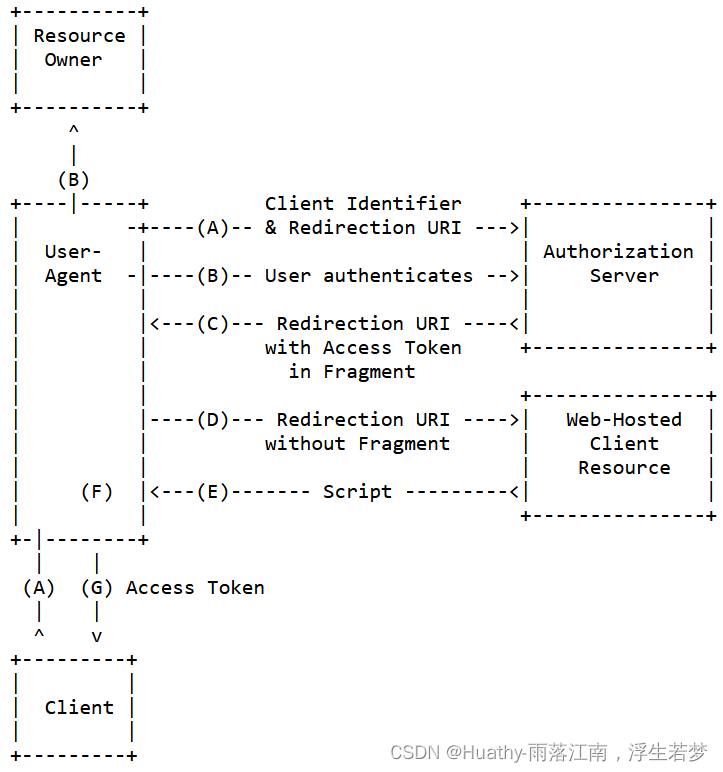 具体步骤如下:
(A)第三方应用将用户导向认证服务器
(B)用户决定是否给于客户端授权。
©假设用户给予授权,认证服务器将用户导向客户端指定的"重定向URI,并在URI的Hash部分包含了访问令牌
(D)浏览器向资源服务器发出请求,其中不包括上一步收到的Hash值
(E)资源服务器返回一个网页,其中包含的代码可以获取Hash值中的令牌
(F)浏览器执行上一步获得的脚本,提取出令牌。
(G)浏览器将令牌发给客户端。
核心参数:
oauth/authorize?response_type=token&client_id=&redirect_uri=&scope=read

密码模式 Resource Owner Password Credentials Grant
用户向客户端提供自己的用户名密码。客户端使用这些信息向服务商索要授权。这种模式,必须要把自己的密码提供给客户端,客户端不存储密码。这通常在用户对客户的高度信任的情况,eg:客户端是系统的一部分、同公司出品的产品。而认证服务器只有在 其他授权模式无法执行的情况才考虑该模式。具体流程如下:
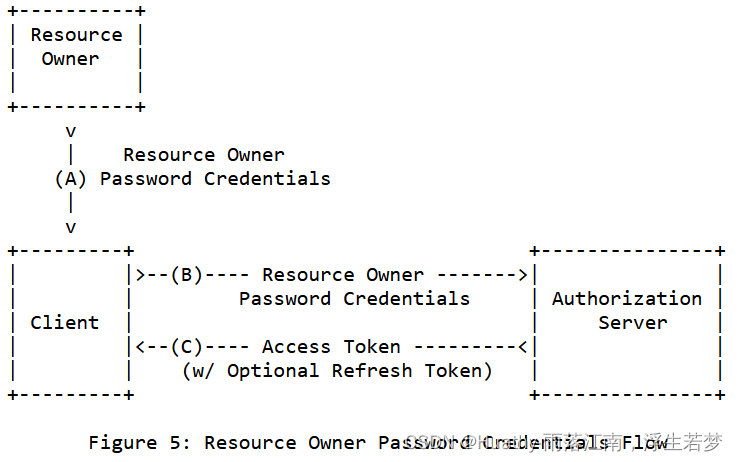 具体步骤如下:
(A) 用户向客户端提供用户名和密码。
(B) 客户端将用户名和密码发给认证服务器,向后者请求令牌。
© 认证服务器确认无误后,向客户端提供访问令牌。
核心参数:
token?grant_type=password&username=&password=&client_id=
客户端模式 Client Credentials Grant
客户端以自己的名义,而不是以用户的名义,向服务器进行认证。严格说,客户端模式并不属于OAuth框架所需要解决的问题。在这种模式,用户直接向客户端注册,客户端以自己的名义要求服务商认证服务,并不存在授权问题。
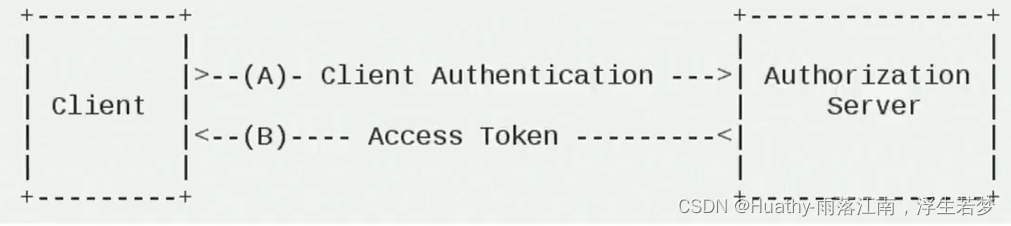 具体步骤如下:
(A) 客户端向认证服务器进行身份认证,并要求一个访问令牌
(B) 认证服务器确认无误后,向客户端提供访问令牌。
token?grant_type=client_credentials&client_id=&client_secret=
OAuth2标准接口
/oauth/authorize:授权端点/oauth/token:获取令牌端点/oauth/confirn_access:哟普农户确认授权提交端点/oauth/error:授权服务器错误信息端点/oauth/check_token:用于资源服务访问的令牌解析端点/oauth/token_key:提供共有密钥的端点,如果使用JWT令牌的话
OAuth2结合Gitee授权案例
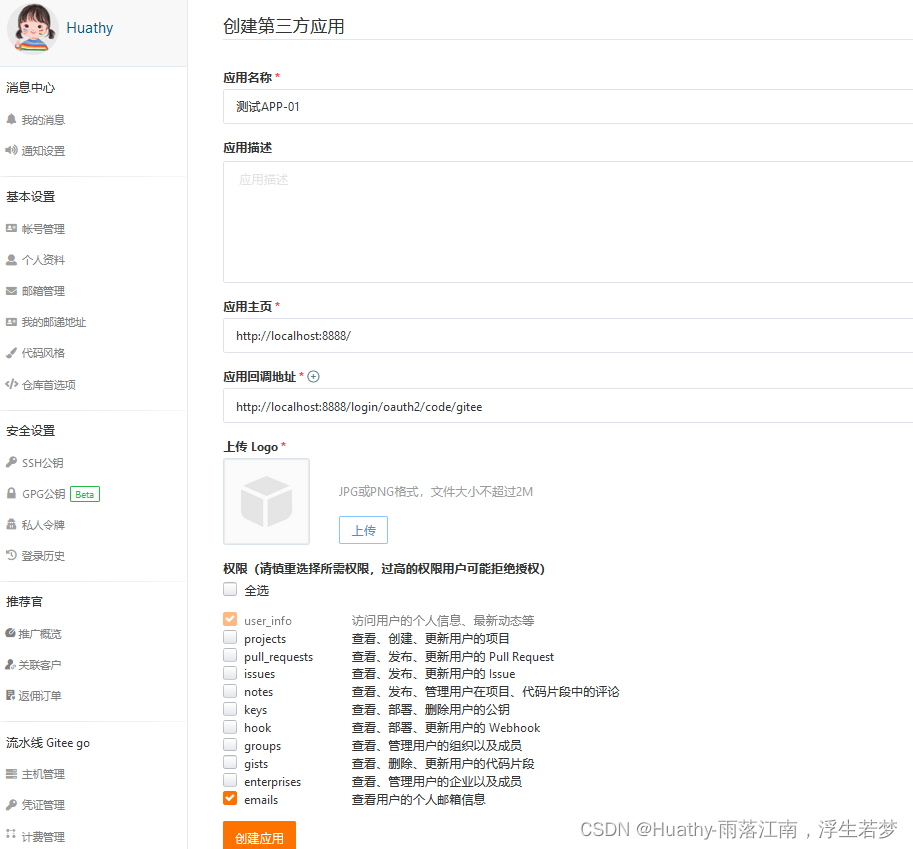
1. 创建应用
https://gitee.com/oauth/applications
2. 编码测试
2.1 引入SpringSecurity和OAuth2依赖
org.springframework.security spring-security-test test
org.springframework.boot spring-boot-starter-oauth2-client
2.2 编写配置类
@EnableWebSecurity
public class SecurityCfg {@Beanpublic SecurityFilterChain configure(HttpSecurity http) throws Exception {http.authorizeHttpRequests().anyRequest().authenticated();// 使用oauth2认证,在认证服务器配置认证服务http.oauth2Login();return http.build();}
}
2.3 编写Controller(登录成功的信息会存放到Authentication)
@RestController
public class HiController {@RequestMapping("/")public String home() {return "HI SPRING SECURITY";}@RequestMapping("/user")public DefaultOAuth2User user() {Object principal = SecurityContextHolder.getContext().getAuthentication().getPrincipal();return (DefaultOAuth2User) principal;}@RequestMapping("/getInfo")public Authentication getInfo() {return SecurityContextHolder.getContext().getAuthentication();}
}
2.4 编写配置
server:port: 8888
logging:level:com.hx: debug
spring:security:oauth2:client:registration:gitee:provider: giteeclient-id: 9bc30f9caafdb4314162eadfb3d0771158de4970483803f76468994e97582d9eclient-secret: 9ea4ab09e03b9e4699e9640f17d9d857fb76402b839a9e7f1a220946cd1b5b82#         rediret-uri 这里一定要与重定向URL一致。如果想要我们的服务器来直接认证的话这里可以采用security写死的在最后加上服务商名称redirect-uri: http://localhost:${server.port}/login/oauth2/code/giteeauthorization-grant-type: "authorization_code"client-name: giteescope: user_infoprovider:gitee:authorization-uri: https://gitee.com/oauth/authorizetoken-uri: https://gitee.com/oauth/tokenuser-info-uri: https://gitee.com/api/v5/useruser-name-attribute: "name"
#https://gitee.com/oauth/authorize?response_type=code&client_id=9bc30f9caafdb4314162eadfb3d0771158de4970483803f76468994e97582d9e&scope=user_info&state=13gm-Lc3DKrr4R2UUGo6qkSWp-_T42UuwcvnN-RVOao%3D&redirect_uri=http://localhost:8888/login/oauth2/code/gitee
# 注意:这里必须要配置provider。否则会提示以下错误。
# Provider ID must be specified for client registration 'gitee'
#  Unknown provider ID 'gitee'
OAuth Client案例原理解析说明
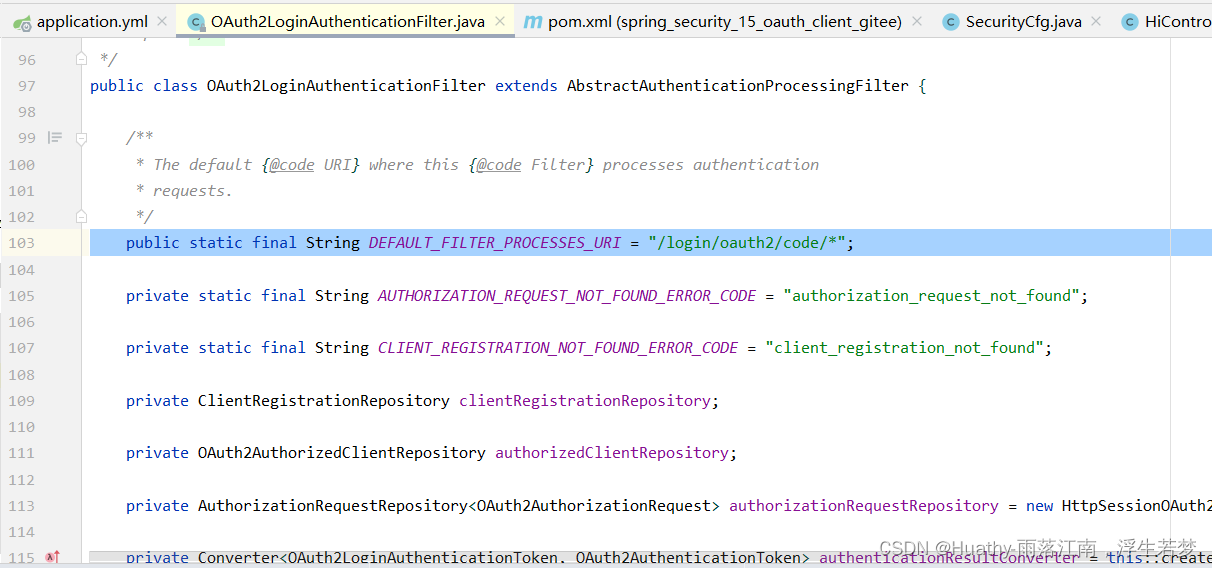
// 核心代码:重写 attemptAuthentication 方法,处理 OAuth2 登录认证请求。@Overridepublic Authentication attemptAuthentication(HttpServletRequest request, HttpServletResponse response)throws AuthenticationException {MultiValueMap params = OAuth2AuthorizationResponseUtils.toMultiMap(request.getParameterMap());if (!OAuth2AuthorizationResponseUtils.isAuthorizationResponse(params)) {OAuth2Error oauth2Error = new OAuth2Error(OAuth2ErrorCodes.INVALID_REQUEST);throw new OAuth2AuthenticationException(oauth2Error, oauth2Error.toString());}OAuth2AuthorizationRequest authorizationRequest = this.authorizationRequestRepository.removeAuthorizationRequest(request, response);if (authorizationRequest == null) {OAuth2Error oauth2Error = new OAuth2Error(AUTHORIZATION_REQUEST_NOT_FOUND_ERROR_CODE);throw new OAuth2AuthenticationException(oauth2Error, oauth2Error.toString());}// 获取注册 IDString registrationId = authorizationRequest.getAttribute(OAuth2ParameterNames.REGISTRATION_ID);// 根据注册 ID 获取客户端注册信息ClientRegistration clientRegistration = this.clientRegistrationRepository.findByRegistrationId(registrationId);if (clientRegistration == null) {OAuth2Error oauth2Error = new OAuth2Error(CLIENT_REGISTRATION_NOT_FOUND_ERROR_CODE,"Client Registration not found with Id: " + registrationId, null);throw new OAuth2AuthenticationException(oauth2Error, oauth2Error.toString());}// 获取重定向 URIString redirectUri = UriComponentsBuilder.fromHttpUrl(UrlUtils.buildFullRequestUrl(request)).replaceQuery(null).build().toUriString();// 将参数转换为授权响应对象OAuth2AuthorizationResponse authorizationResponse = OAuth2AuthorizationResponseUtils.convert(params, redirectUri);// 构建 OAuth2LoginAuthenticationToken 对象Object authenticationDetails = this.authenticationDetailsSource.buildDetails(request);OAuth2LoginAuthenticationToken authenticationRequest = new OAuth2LoginAuthenticationToken(clientRegistration,new OAuth2AuthorizationExchange(authorizationRequest, authorizationResponse));authenticationRequest.setDetails(authenticationDetails);// 进行认证并获取 OAuth2LoginAuthenticationToken 对象OAuth2LoginAuthenticationToken authenticationResult = (OAuth2LoginAuthenticationToken) this.getAuthenticationManager().authenticate(authenticationRequest);// 将 OAuth2LoginAuthenticationToken 对象转换为 OAuth2AuthenticationToken 对象OAuth2AuthenticationToken oauth2Authentication = this.authenticationResultConverter.convert(authenticationResult);Assert.notNull(oauth2Authentication, "authentication result cannot be null");oauth2Authentication.setDetails(authenticationDetails);// 创建 OAuth2AuthorizedClient 对象OAuth2AuthorizedClient authorizedClient = new OAuth2AuthorizedClient(authenticationResult.getClientRegistration(), oauth2Authentication.getName(),authenticationResult.getAccessToken(), authenticationResult.getRefreshToken());// 将 OAuth2AuthorizedClient 对象保存到 authorizedClientRepositorythis.authorizedClientRepository.saveAuthorizedClient(authorizedClient, oauth2Authentication, request, response);// 返回 OAuth2AuthenticationToken 对象return oauth2Authentication;}
OAuth2简介和历史
授权、资源服务器
搭建授权服务器,我们可以选择一些现成的开源项目,直接运行即可:
- keycloak:RedFat公司的开源工具,提供如单点、OpenID、可视化后台等实用功能
- Apache Oltu:
搭建包含授权服务器、资源服务器以及客户端在内的OAuth2案例:
- 授权服务器:采用较早期的spring-cloud-starter-oauth2来搭建
- 资源服务器:采用最新的springSecurity5.X搭建
- 客户端采用最新的spring security 5.x搭建
1. 授权服务器搭建
1.1 搭建 基于内存客户端和令牌存储 的资源服务器
引入依赖
org.springframework.cloud spring-cloud-starter-oauth2 2.2.5.RELEASE
org.springframework.boot spring-boot-starter-security
org.springframework.boot spring-boot-starter-web
编写SecurityCfg
@Configuration
public class SecurityCfg extends WebSecurityConfigurerAdapter {@Beanpublic PasswordEncoder passwordEncoder(){return new BCryptPasswordEncoder();}@Beanpublic UserDetailsService myUserDetailsService() {InMemoryUserDetailsManager userDetailsService = new InMemoryUserDetailsManager();userDetailsService.createUser(User.withUsername("whx").password(passwordEncoder().encode("123")).roles("admin").build());return userDetailsService;}@Overridepublic void configure(AuthenticationManagerBuilder builder) throws Exception {builder.userDetailsService(myUserDetailsService());}@Overrideprotected void configure(HttpSecurity http) throws Exception {http.authorizeRequests().anyRequest().authenticated();http.formLogin();http.csrf().disable();}
}
编写授权服务器配置AuthorizationServerCfg
@Configuration
@EnableAuthorizationServer   // 指定为授权服务器
public class AuthorizationServerCfg extends AuthorizationServerConfigurerAdapter {@Autowiredpublic PasswordEncoder passwordEncoder;/*** 用来配置授权服务器可以为哪些客户端授权** @param clients 需要初始化一个客户端信息(clientID、secret、redirectURI、使用哪种授权模式)* @throws Exception*/@Overridepublic void configure(ClientDetailsServiceConfigurer clients) throws Exception {clients.inMemory().withClient("hx-01")// 明文报错 java.lang.IllegalArgumentException: There is no PasswordEncoder mapped for the id "null".secret(passwordEncoder.encode("123")).redirectUris("http://localhost:9999")// 授权服务器支持的模式:授权码模式.authorizedGrantTypes("authorization_code")// 令牌允许获取的资源权限.scopes("read:user");// 1. 请求用户是否授权// 访问:localhost:port/oauth/authorize?client_id=id&response_type=code&redirect_uri=// http://localhost:8081/oauth/authorize?client_id=hx-01&response_type=code&redirect_uri=http://localhost:9999// 跳转http://localhost:9999/?code=yN6qXh// 2. 授权之后根据授权码获取令牌 /oauth/token id secret redirectURI code}
}
测试
- 在浏览器打开地址
http://localhost:8081/oauth/authorize?client_id=hx-01&response_type=code&redirect_uri=http://localhost:9999 - 浏览器跳转http://localhost:9999/?code=yN6qXh
- 根据授权码获取令牌,编写test.http
POST http://hx-01:123@localhost:8081/oauth/token
Content-Type: application/x-www-form-urlencodedgrant_type=authorization_code&code=030QY2&redirect_uri=http://localhost:9999###
#{
#  "access_token": "129295fe-34b6-4c31-aaa1-1a2c7e500416",
#  "token_type": "bearer",
#  "expires_in": 43199,
#  "scope": "read:user"
#}
1.2 刷新令牌
基于搭建好的授权服务器做以下修改:
修改授权服务配置AuthorizationServerCfg
- 修改authorizedGrantTypes,增加刷新令牌的模式
@Override
public void configure(ClientDetailsServiceConfigurer clients) throws Exception {clients.inMemory().withClient("hx-01")// 明文报错 java.lang.IllegalArgumentException: There is no PasswordEncoder mapped for the id "null".secret(passwordEncoder.encode("123")).redirectUris("http://localhost:9999")// 授权服务器支持的模式:授权码模式、刷新令牌.authorizedGrantTypes("authorization_code","refresh_token")// 令牌允许获取的资源权限.scopes("read:user");
}
- 必须指定userDetailService
@Autowired
public UserDetailsService userDetailsService;
@Override
public void configure(AuthorizationServerEndpointsConfigurer endpoints) throws Exception {endpoints.userDetailsService(userDetailsService);
}
测试
### 刷新令牌
POST http://hx-01:123@localhost:8081/oauth/token
Content-Type: application/x-www-form-urlencodedgrant_type=refresh_token&client_id=hx-01&refresh_token=e6b0a11b-9644-4dd8-a4f8-369184360cd1###
1.3 简化、密码、客户端凭证模式
修改代码增加授权模式
.authorizedGrantTypes("authorization_code", "refresh_token", "implicit", "password", "client_credentials")
对于密码模式需要配置authenticationManager
@Override
public void configure(AuthorizationServerEndpointsConfigurer endpoints) throws Exception {// authorization_code模式需要配置授权服务使用哪个userDetailsServiceendpoints.userDetailsService(userDetailsService);// 对于密码模式是使用用户名密码进行一个颁发,所以需要让授权服务知道我们的authenticationManager。只有知道authenticationManager后才知道我们使用的认证方式endpoints.authenticationManager(authenticationManager);
}
测试
简化模式
### 简化模式(这种模式不支持的)
POST http://hx-01:123@localhost:8081/oauth/token
Content-Type: application/x-www-form-urlencodedgrant_type=implicit&refresh_token=e6b0a11b-9644-4dd8-a4f8-369184360cd1###
密码模式
### 密码模式(支持令牌刷新)
POST http://hx-01:123@localhost:8081/oauth/token
Content-Type: application/x-www-form-urlencodedgrant_type=password&username=whx&password=123###
客户端凭证模式
### 客户端模式
POST http://hx-01:123@localhost:8081/oauth/token
Content-Type: application/x-www-form-urlencodedgrant_type=client_credentials&redirect_uri=http://localhost:9999###
1.4 基于数据库的客户端、令牌存储
在上面的案例中TokenStore默认是基于内存的实现,对于client信息,clientDetailsService接口负责从存储仓库中读取数据,而上面的案例也是从内存中获取。
这里我们修改为数据库存储,修改接口实现类
建库
SQL地址:(注意用BLOB替换LONGVARBINARY)
https://github.com/spring-attic/spring-security-oauth/blob/main/spring-security-oauth2/src/test/resources/schema.sql
-- used in tests that use HSQL
create table oauth_client_details (client_id VARCHAR(256) PRIMARY KEY,resource_ids VARCHAR(256),client_secret VARCHAR(256),scope VARCHAR(256),authorized_grant_types VARCHAR(256),web_server_redirect_uri VARCHAR(256),authorities VARCHAR(256),access_token_validity INTEGER,refresh_token_validity INTEGER,additional_information VARCHAR(4096),autoapprove VARCHAR(256)
);create table oauth_client_token (token_id VARCHAR(256),token BLOB,authentication_id VARCHAR(256) PRIMARY KEY,user_name VARCHAR(256),client_id VARCHAR(256)
);create table oauth_access_token (token_id VARCHAR(256),token BLOB,authentication_id VARCHAR(256) PRIMARY KEY,user_name VARCHAR(256),client_id VARCHAR(256),authentication BLOB,refresh_token VARCHAR(256)
);create table oauth_refresh_token (token_id VARCHAR(256),token BLOB,authentication BLOB
);create table oauth_code (code VARCHAR(256), authentication BLOB
);create table oauth_approvals (userId         varchar(256) null,clientId       varchar(256) null,scope          varchar(256) null,status         varchar(10) null,expiresAt      timestamp  ,lastModifiedAt timestamp default current_timestamp
);-- customized oauth_client_details table
create table ClientDetails (appId VARCHAR(256) PRIMARY KEY,resourceIds VARCHAR(256),appSecret VARCHAR(256),scope VARCHAR(256),grantTypes VARCHAR(256),redirectUrl VARCHAR(256),authorities VARCHAR(256),access_token_validity INTEGER,refresh_token_validity INTEGER,additionalInformation VARCHAR(4096),autoApproveScopes VARCHAR(256)
);INSERT INTO `demo`.`oauth_client_details`(`client_id`, `resource_ids`, `client_secret`, `scope`, `authorized_grant_types`, `web_server_redirect_uri`, `authorities`, `access_token_validity`, `refresh_token_validity`, `additional_information`, `autoapprove`) VALUES ('hx01', NULL, '$2a$10$XE/Q7aLf0mh7xaZkH6PudeVlBCsQnpIOrbSRd.7Ji.d4M/zYCN3QS', 'read', 'authorization_code,refresh_token', 'http://localhost:9999', NULL, NULL, NULL, NULL, NULL);
引入配置
mysql mysql-connector-java org.springframework.boot spring-boot-starter-jdbc 修改配置
server:port: 8081
spring:datasource:driver-class-name: com.mysql.jdbc.Driverurl: jdbc:mysql://localhost:3306/demo?characterEncoding=UTF-8username: rootpassword: admin
编码(新建jdbc的授权服务器配置JdbcAuthorizationServerCfg)
@Configuration
@EnableAuthorizationServer   // 指定为授权服务器
public class JdbcAuthorizationServerCfg extends AuthorizationServerConfigurerAdapter {@Autowiredprivate DataSource dataSource;@Autowiredprivate PasswordEncoder passwordEncoder;@Autowiredprivate AuthenticationManager authenticationManager;/* ==================配置客户端信息============= */@Overridepublic void configure(ClientDetailsServiceConfigurer clients) throws Exception {clients.withClientDetails(myClientDetailsService());}@Beanpublic ClientDetailsService myClientDetailsService() {JdbcClientDetailsService jdbcClientDetailsService = new JdbcClientDetailsService(dataSource);// 由于我在数据库使用了BCryptPasswordEncoder加密,这里要告诉jdbcDetailsServicejdbcClientDetailsService.setPasswordEncoder(passwordEncoder);return jdbcClientDetailsService;}/* ==================配置令牌存储信息============= */@Overridepublic void configure(AuthorizationServerEndpointsConfigurer endpoints) throws Exception {// 为了支持密码模式endpoints.authenticationManager(authenticationManager);endpoints.tokenStore(tokenStore());/* === 配置tokenService参数 === */// 修改默认令牌生成服务DefaultTokenServices tokenServices = new DefaultTokenServices();// 基于数据库令牌生成tokenServices.setTokenStore(endpoints.getTokenStore());// 是否支持刷新令牌tokenServices.setSupportRefreshToken(true);// 是否重复使用刷新令牌(直到过期)tokenServices.setReuseRefreshToken(true);// 设置客户端信息tokenServices.setClientDetailsService(endpoints.getClientDetailsService());// 用来控制令牌存储增强策略tokenServices.setTokenEnhancer(endpoints.getTokenEnhancer());// 访问令牌的默认有效期(以秒为单位)。过期的令牌为零或负数。tokenServices.setAccessTokenValiditySeconds((int) TimeUnit.DAYS.toSeconds(30));// 刷新令牌有效性(秒)。如果小于等于0,则令牌不过期。tokenServices.setRefreshTokenValiditySeconds((int) TimeUnit.DAYS.toSeconds(3));// 使用配置的令牌服务endpoints.tokenServices(tokenServices);}@Beanpublic TokenStore tokenStore() {return new JdbcTokenStore(dataSource);}
}
2. 资源服务器搭建
引入依赖
mysql mysql-connector-java
org.springframework.boot spring-boot-starter-jdbc
org.springframework.security spring-security-oauth2-resource-server
org.springframework.cloud spring-cloud-starter-oauth2 2.2.5.RELEASE
org.springframework.boot spring-boot-starter-security
org.springframework.boot spring-boot-starter-web
编写配置
server:port: 8082
spring:datasource:driver-class-name: com.mysql.jdbc.Driverurl: jdbc:mysql://localhost:3306/demo?characterEncoding=UTF-8username: rootpassword: admin
编写资源服务器配置ResourceServerCfg
@Configuration
// 开启资源服务器
@EnableResourceServer
public class ResourceServerCfg extends ResourceServerConfigurerAdapter {@Autowiredprivate DataSource dataSource;@Overridepublic void configure(ResourceServerSecurityConfigurer resources) throws Exception {resources.tokenStore(new JdbcTokenStore(dataSource));}
}
延用授权服务器的SecurityCfg
@Configuration
public class SecurityCfg extends WebSecurityConfigurerAdapter {@Beanpublic PasswordEncoder passwordEncoder() {return new BCryptPasswordEncoder();}@Beanpublic UserDetailsService myUserDetailsService() {InMemoryUserDetailsManager userDetailsService = new InMemoryUserDetailsManager();userDetailsService.createUser(User.withUsername("whx").password(passwordEncoder().encode("123")).roles("admin").build());return userDetailsService;}/*** 将内部的AuthenticationManager暴露出来** @return* @throws Exception*/@Override@Beanpublic AuthenticationManager authenticationManagerBean() throws Exception {return super.authenticationManagerBean();}@Overridepublic void configure(AuthenticationManagerBuilder builder) throws Exception {builder.userDetailsService(myUserDetailsService());}@Overrideprotected void configure(HttpSecurity http) throws Exception {http.authorizeRequests().anyRequest().authenticated();http.formLogin();http.csrf().disable();}
}
编写资源HiController
@RestController
public class HiController {@RequestMapping("/")public String index() {Authentication authentication = SecurityContextHolder.getContext().getAuthentication();return "HI Spring Security Resource Server
";}@RequestMapping("/hi")public String hi() {Authentication authentication = SecurityContextHolder.getContext().getAuthentication();System.out.println("身份信息:authentication.getPrincipal() = " + authentication.getPrincipal());System.out.println("权限信息:authentication.getAuthorities() = " + authentication.getAuthorities());System.out.println("凭证信息:authentication.getCredentials() = " + authentication.getCredentials());return "HI Spring Security
";}
}
测试
# 访问获取授权码 http://localhost:8081/oauth/authorize?client_id=hx-01&response_type=code&redirect_uri=http://localhost:9999
### 获取令牌
POST http://hx-01:123@localhost:8081/oauth/token
Content-Type: application/x-www-form-urlencodedgrant_type=authorization_code&redirect_uri=http://localhost:9999&code=losfHy###
#{
#  "access_token": "55b374be-af41-4853-95c6-e31c983ebec1",
#  "token_type": "bearer",
#  "refresh_token": "e6b0a11b-9644-4dd8-a4f8-369184360cd1",
#  "expires_in": 43199,
#  "scope": "read:user"
#}
##########################################################################################
### 获取资源服务器资源
GET http://localhost:8082/hi
Authorization: Bearer 4ddef2f1-2532-4564-8327-df2a108e2b27
###
##########################################################################################
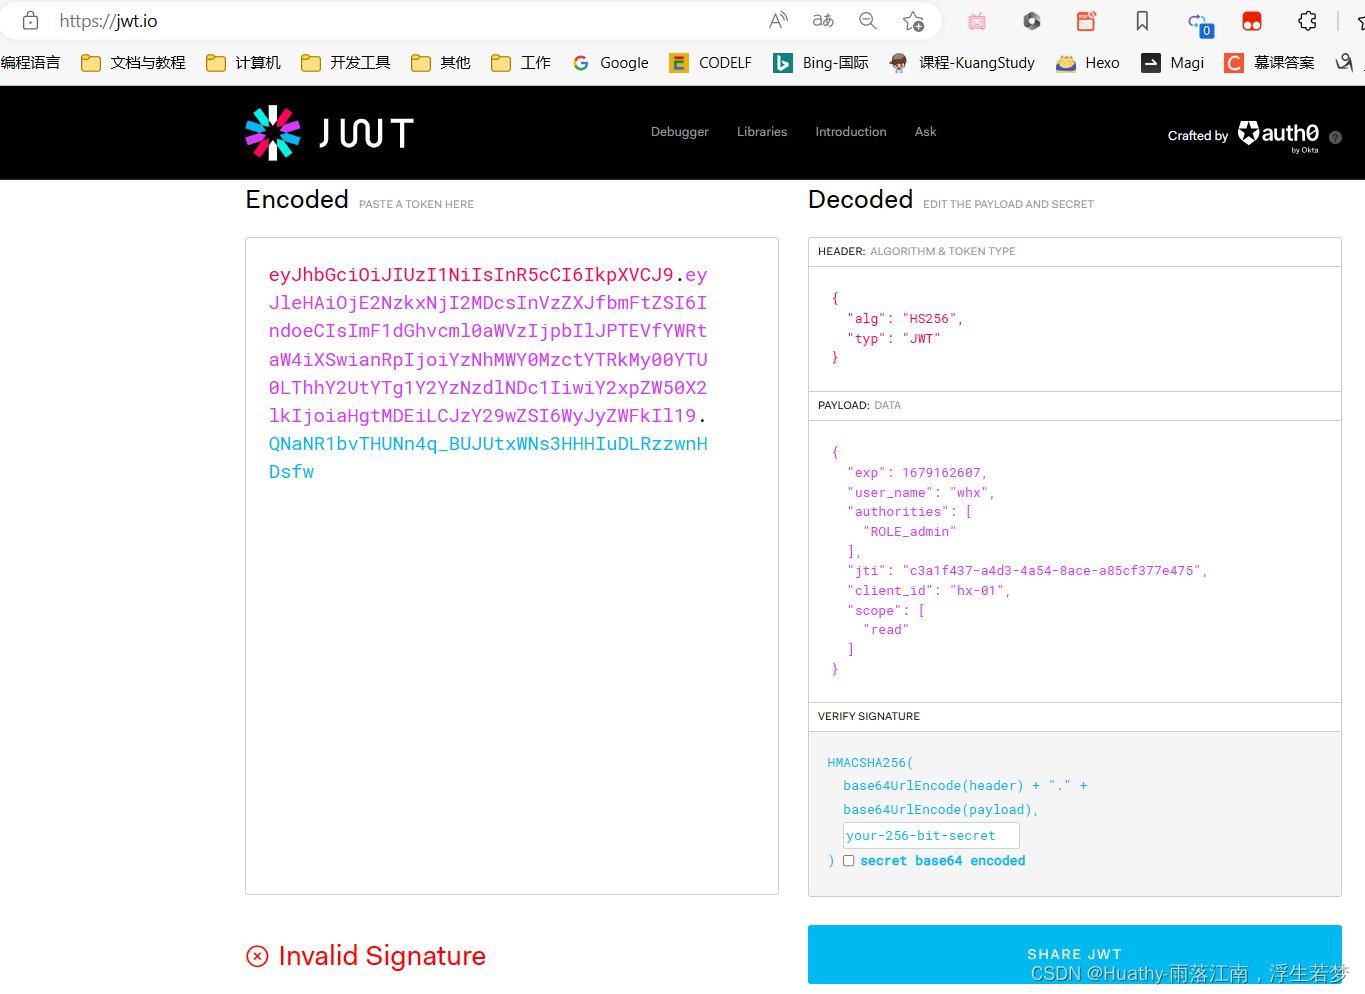
JWT(Java Web Token)令牌的使用
授权服务器生成格式如下的jwt,资源服务器校验
jwt:header.payload.sing
header:基础请求头
payload:存储非敏感信息
sing:加密算法和密钥
1. 授权服务器颁发JWT令牌
编写JWT授权配置类JwtAuthorizationServerCfg
@Configuration
@EnableAuthorizationServer   // 指定为授权服务器
public class JwtAuthorizationServerCfg extends AuthorizationServerConfigurerAdapter {@Autowiredprivate DataSource dataSource;@Autowiredprivate PasswordEncoder passwordEncoder;@Autowiredprivate AuthenticationManager authenticationManager;/* ==================配置客户端信息============= */@Overridepublic void configure(ClientDetailsServiceConfigurer clients) throws Exception {clients.withClientDetails(myClientDetailsService());}@Beanpublic ClientDetailsService myClientDetailsService() {JdbcClientDetailsService jdbcClientDetailsService = new JdbcClientDetailsService(dataSource);// 由于我在数据库使用了BCryptPasswordEncoder加密,这里要告诉jdbcDetailsServicejdbcClientDetailsService.setPasswordEncoder(passwordEncoder);return jdbcClientDetailsService;}/* ==================配置令牌存储信息============= */@Beanpublic TokenStore tokenStore() {// 这里需要编写一个jwt转换器来将jwt转换为对象return new JwtTokenStore(jwtAccessTokenConverter());}private JwtAccessTokenConverter jwtAccessTokenConverter() {JwtAccessTokenConverter jwtAccessTokenConverter = new JwtAccessTokenConverter();// 使用同一个密码来编码JWT中的OAuth2令牌。在生产环境建议加密jwtAccessTokenConverter.setSigningKey("123");return jwtAccessTokenConverter;}@Overridepublic void configure(AuthorizationServerEndpointsConfigurer endpoints) throws Exception {endpoints.tokenStore(tokenStore()).accessTokenConverter(jwtAccessTokenConverter()).authenticationManager(authenticationManager);}
}
2. 使用JWT令牌访问资源服务器
编写基于JWT的资源服务器配置类
@Configuration
// 开启资源服务器
@EnableResourceServer
public class JwtResourceServerCfg extends ResourceServerConfigurerAdapter {@Overridepublic void configure(ResourceServerSecurityConfigurer resources) throws Exception {resources.tokenStore(jwtTokenStore());}// 注意tokenStore和converter都要交给spring来管理@Beanpublic TokenStore jwtTokenStore() {return new JwtTokenStore(jwtAccessTokenConverter());}@Beanpublic JwtAccessTokenConverter jwtAccessTokenConverter() {JwtAccessTokenConverter tokenConverter = new JwtAccessTokenConverter();tokenConverter.setSigningKey("123");return tokenConverter;}
}
3. 测试
# 访问获取授权码 http://localhost:8081/oauth/authorize?client_id=hx-01&response_type=code&redirect_uri=http://localhost:9999
### 获取令牌
POST http://hx-01:123@localhost:8081/oauth/token
Content-Type: application/x-www-form-urlencodedgrant_type=authorization_code&redirect_uri=http://localhost:9999&code=DedxTZ
###
### JWT返回
#{
#  "access_token": "eyJhbGciOiJIUzI1NiIsInR5cCI6IkpXVCJ9.eyJleHAiOjE2NzkxNjE0NTUsInVzZXJfbmFtZSI6IndoeCIsImF1dGhvcml0aWVzIjpbIlJPTEVfYWRtaW4iXSwianRpIjoiM2FlMGIwODQtY2Y3MS00MTc0LThmYTMtMTA3ZjE1ODc5NTk0IiwiY2xpZW50X2lkIjoiaHgtMDEiLCJzY29wZSI6WyJyZWFkIl19.9BNwYASc060J94nl_VssVersm1e6JJGTRVLKpTnKVQk",
#  "token_type": "bearer",
#  "refresh_token": "eyJhbGciOiJIUzI1NiIsInR5cCI6IkpXVCJ9.eyJ1c2VyX25hbWUiOiJ3aHgiLCJzY29wZSI6WyJyZWFkIl0sImF0aSI6IjNhZTBiMDg0LWNmNzEtNDE3NC04ZmEzLTEwN2YxNTg3OTU5NCIsImV4cCI6MTY4MTcxMDI1NSwiYXV0aG9yaXRpZXMiOlsiUk9MRV9hZG1pbiJdLCJqdGkiOiIxNDdmMzRiNi1iN2ZhLTRjNGItYmVlMC0zZjgzNzM2OWU2ZjciLCJjbGllbnRfaWQiOiJoeC0wMSJ9.3ZuywZAxsU7_nTn2lfvJOFtOnXlholEATaYFP8X1vAs",
#  "expires_in": 43199,
#  "scope": "read",
#  "jti": "3ae0b084-cf71-4174-8fa3-107f15879594"
#}
#######################################################################################
### 获取资源服务器资源
GET http://localhost:8082/hi
Authorization: Bearer eyJhbGciOiJIUzI1NiIsInR5cCI6IkpXVCJ9.eyJleHAiOjE2NzkxNjI2MDcsInVzZXJfbmFtZSI6IndoeCIsImF1dGhvcml0aWVzIjpbIlJPTEVfYWRtaW4iXSwianRpIjoiYzNhMWY0MzctYTRkMy00YTU0LThhY2UtYTg1Y2YzNzdlNDc1IiwiY2xpZW50X2lkIjoiaHgtMDEiLCJzY29wZSI6WyJyZWFkIl19.QNaNR1bvTHUNn4q_BUJUtxWNs3HHHIuDLRzzwnHDsfw
###
##########################################################################################
通过官网来解析查看JWT的内容