MongoDB【部署 01】mongodb最新版本6.0.5安装部署配置使用及mongodb-shell1.8.0安装使用(云盘分享安装文件)
创始人
2025-05-30 03:41:56
0次
云盘分享文件:

链接:https://pan.baidu.com/s/11sbj1QgogYHPM4udwoB1rA
提取码:l2wz
1.mongodb简单介绍
MongoDB的 官网 内容还是挺丰富的。
是由 C++语言编写的,是一个基于分布式文件存储的开源数据库系统。在高负载的情况下,添加更多的节点,可以保证服务器性能。
旨在为 WEB 应用提供可扩展的高性能数据存储解决方案。
将数据存储为一个文档,数据结构由键值(key=>value)对组成。
MongoDB文档类似于 JSON 对象。字段值可以包含其他文档,数组及文档数组。
MongoDB的特点:
- MongoDB 是一个面向文档存储的数据库,操作起来比较简单和容易。
- 可以在 MongoDB 记录中设置任何属性的索引 (如:FirstName=“Sameer”,Address=“8 Gandhi Road”)来实现更快的排序。
- 可以通过本地或者网络创建数据镜像,这使得 MongoDB 有更强的扩展性。
- 如果负载的增加(需要更多的存储空间和更强的处理能力) ,它可以分布在计算机网络中的其他节点上这就是所谓的分片。
- 支持丰富的查询表达式。查询指令使用 JSON 形式的标记,可轻易查询文档中内嵌的对象及数组。
- 使用 update()命令可以实现替换完成的文档(数据)或者一些指定的数据字段 。
- Map/Reduce 主要是用来对数据进行批量处理和聚合操作。【这个特点类似与Hadoop的了】
- Map和Reduce。Map 函数调用 emit(key,value)遍历集合中所有的记录,将 key 与 value 传给 Reduce 函数进行处理。 Map 函数和 Reduce 函数是使用 Javascript 编写的,并可以通过 db.runCommand 或 mapreduce 命令来执行 MapReduce 操作。
- GridFS 是 MongoDB 中的一个内置功能,可以用于存放大量小文件。
- MongoDB 允许在服务端执行脚本,可以用 Javascript 编写某个函数,直接在服务端执行,也可以把函数的定义存储在服务端,下次直接调用即可。
2.下载安装配置
2.1 下载
下载中心 可以下载各种不同操作系统和版本的安装包,根据需要进行下载:
[root@tcloud ~]# cat /etc/centos-release
CentOS Linux release 7.9.2009 (Core)

2.2 安装
官网也是有 安装文档 的,小伙伴可以根据自己系统的情况查看相应的安装过程。

CentOS安装 官网安装步骤 整理如下:
# 1.添加 mongod 用户和用户组
groupadd mongod
useradd -r -m -g mongod mongod
# 2.安装依赖【否则可能会出现报错】
yum install libcurl openssl xz-libs
# 3.解压
tar -zxvf mongodb-linux-x86_64-rhel70-6.0.5.tgz
# 移动文件(根据个人习惯 可不进行操作)
mv ./mongodb-linux-x86_64-rhel70-6.0.5/ /usr/local/mongodb/
# 4.PATH 环境变量配置(两种方式)
cp /usr/local/mongodb/bin/* /usr/local/bin/
# 或
ln -s /usr/local/mongodb/bin/* /usr/local/bin/
# 5.创建 mongodb 的数据文件夹和日志文件夹并赋权
mkdir -p /var/lib/mongo
mkdir -p /var/log/mongodb
chown -R mongod:mongod /var/lib/mongo
chown -R mongod:mongod /var/log/mongodb
# 6.启动【数据路径 日志路径 绑定的IP】
# --bind_ip 需要注意
mongod --dbpath /var/lib/mongo --logpath /var/log/mongodb/mongod.log --bind_ip 127.0.0.1,tcloud --forkabout to fork child process, waiting until server is ready for connections.
forked process: 24774
child process started successfully, parent exiting# 还可以使用配置文件的方式启动【这种方式随后进行介绍】
mongod -f ../conf/mongodb.conf
# 7.验证启动成功 /var/log/mongodb/mongod.log
[initandlisten] waiting for connections on port 27017
2.3 mongodb-shell 安装
mongodb-shell的 下载页面 ,可以根据需要进行下载安装:

我使用的是 CentOS 所以下载的是rpm类型的安装包,安装过程很简单:
# 1.安装
rpm -ivh mongodb-mongosh-1.8.0.x86_64.rpm
.tgz类型文件的安装说明【安装过程未验证】
# 1.解压
tar -zxvf mongosh-1.8.0-linux-x64.tgz
# 2.赋权
chmod +x bin/mongosh
# 3.配置环境变量(两种方式)
cp mongosh /usr/local/bin/
cp mongosh_csfle_v1.so /usr/local/lib/
# 或
sudo ln -s $(pwd)/bin/* /usr/local/bin/
mongodb shell 有详细的 使用说明 小伙伴儿们可以参考。
# 启动命令
mongosh
一下是启动后的信息:
mongoshCurrent Mongosh Log ID: 6414231e638f2f5b00261acc
Connecting to:          mongodb://127.0.0.1:27017/?directConnection=true&serverSelectionTimeoutMS=2000&appName=mongosh+1.8.0
Using MongoDB:          6.0.5
Using Mongosh:          1.8.0For mongosh info see: https://docs.mongodb.com/mongodb-shell/To help improve our products, anonymous usage data is collected and sent to MongoDB periodically (https://www.mongodb.com/legal/privacy-policy).
You can opt-out by running the disableTelemetry() command.------The server generated these startup warnings when booting2023-03-17T16:20:20.500+08:00: Using the XFS filesystem is strongly recommended with the WiredTiger storage engine. See http://dochub.mongodb.org/core/prodnotes-filesystem2023-03-17T16:20:21.190+08:00: Access control is not enabled for the database. Read and write access to data and configuration is unrestricted2023-03-17T16:20:21.190+08:00: You are running this process as the root user, which is not recommended2023-03-17T16:20:21.190+08:00: This server is bound to localhost. Remote systems will be unable to connect to this server. Start the server with --bind_ip  to specify which IP addresses it should serve responses from, or with --bind_ip_all to bind to all interfaces. If this behavior is desired, start the server with --bind_ip 127.0.0.1 to disable this warning2023-03-17T16:20:21.191+08:00: /sys/kernel/mm/transparent_hugepage/enabled is 'always'. We suggest setting it to 'never'2023-03-17T16:20:21.191+08:00: /sys/kernel/mm/transparent_hugepage/defrag is 'always'. We suggest setting it to 'never'2023-03-17T16:20:21.191+08:00: vm.max_map_count is too low
------------Enable MongoDB's free cloud-based monitoring service, which will then receive and displaymetrics about your deployment (disk utilization, CPU, operation statistics, etc).The monitoring data will be available on a MongoDB website with a unique URL accessible to youand anyone you share the URL with. MongoDB may use this information to make productimprovements and to suggest MongoDB products and deployment options to you.To enable free monitoring, run the following command: db.enableFreeMonitoring()To permanently disable this reminder, run the following command: db.disableFreeMonitoring()
------test>
2.4 测试
-- 1.查看所有数据库
show dbs
-- 实例
test> show dbs
admin   40.00 KiB
config  12.00 KiB
local   40.00 KiB-- 2.切换数据库
use dbName
-- 实例
test> use config
switched to db config
config>-- 3.查看数据库所有表
show tables
-- 实例
config> show tables
system.sessions-- 更多操作这里不再介绍
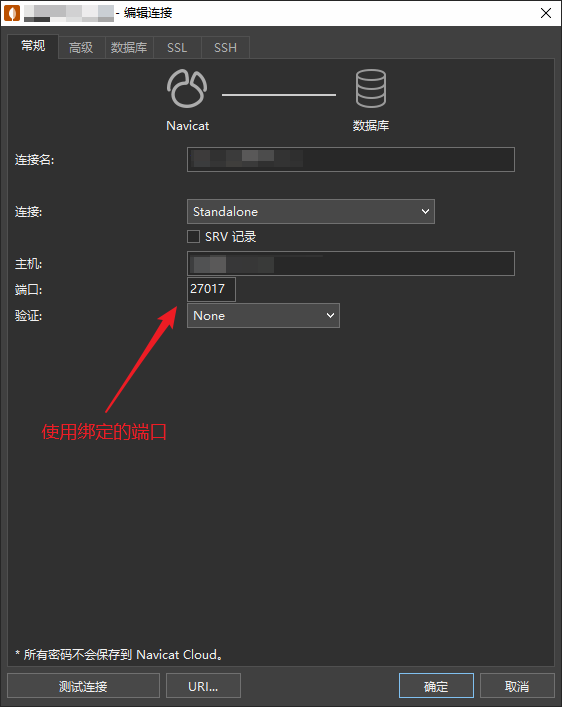
安装成功后可以使用Navicat进行连接:
3.总结
MongoDB的安装部署还是很简单的,主要在后期的应用。
相关内容
热门资讯
造假泛滥、虫入车间、产能拉胯:...
订阅 快刀财经 ▲ 做您的私人商学院世界药房的致命短板。作者:朱末来源:快刀财经(ID:kuai...
影石创新股价“脚踝斩”,刘靖康...
出品|达摩财经近日,第三方数据公司IDC发布了2026年一季度全球手持智能相机行业报告。报告数据显示...
美股半导体股,集体上涨 美股半...
6月29日,美股三大指数集体高开,道指涨0.29%,纳指涨0.96%,标普500指数涨0.55%。 ...
三只*ST股,将摘星脱帽 st...
6月29日晚间,A股三家*ST公司公告称将“摘星脱帽”。 具体来看,*ST艾艾发布关于撤销退市风险警...
【就业创业典型】大棚逐梦人:一...
编者按:近年来,延安市残疾人工作坚持以习近平新时代中国特色社会主义思想为指导,以促进残疾人事业全面高...
公募基金锚定新质生产力,多维赋...
6月22日消息,中国证监会主席吴清近日在2026陆家嘴论坛上表示,资本市场与新质生产力双向奔赴、相互...
液冷服务器概念震荡走强,冰轮环...
6月22日消息,午后液冷服务器概念震荡走强,冰轮环境9天5板,此前康盛股份涨停,大元泵业、川润股份、...
涉留神峪煤矿事故,国家矿山安全...
6月22日消息,国家矿山安全监察局山西局监察执法八处三级调研员耿青禄涉嫌严重违法,涉通洲集团留神峪煤...
周立成拟任中国投资协会秘书长
6月22日消息,中国投资协会发布关于中国投资协会第五届理事会届中调整负责人人选的公示:周立成,男,汉...
以防长称以军已做好对伊采取独立...
据央视新闻,以色列国防部长卡茨日前在与军事记者的闭门谈话中,阐述了以色列在黎巴嫩、伊朗及加沙地带等多...